How To Use Java Event Listeners in Selenium WebDriver?


While working on any UI functionality, I tend to aspire for more and more logs and reporting. This happens especially when performing test automation on web pages. Testing such websites means interacting with several web elements, which would require a lot of movement from one page to another, from one function to another.
Now, having stated the problem statement and scenario it occurs in, the next question would be how to do it. Is there any tool or means to fulfill this requirement? The answer is YES!
Selenium, the most used web UI automation framework, has certain utilities that can achieve this. It facilitates such interactions through different locators in Selenium and provides all the required data through Listeners.
A Listener, as the name suggests, is someone who listens. And in this case, it listens to all the activities, interactions, or events you do on a document. So let’s get into more details and see how we can implement it using Java Event Listeners.
What are Listeners?
Listeners in Selenium possess the ability to listen to any events like entering data, a button click, navigation to a page, an exception, etc. These are defined with the help of an interface in Selenium and help to customize system behavior by performing actions on events as defined in code.
These are the ones that satiate any automation tester’s hunger for more logs and reporting, which can come in handy to debug failures in the script at any later stage.
Why do we need Listeners?
Let’s consider a scenario where we are working on java automation testing using Selenium script, and we want to log the order of each event executed and take a full page screenshot when a test ends or there is an exception.
One way to do so would be to add a function call after each event, like click which logs it, and add a function that helps take a screenshot in Selenium after each case ends and in the catch block of exception handling. However, this would be cumbersome to do and require a lot of unnecessary effort.
This is when event listeners come to the rescue. This can be done very easily with the help of Java Event Listeners in Selenium WebDriver. We can simply implement all the functions this interface provides and let it do all the work.
Java Event Listeners in Selenium WebDriver
WebDriverEventListener is the type of listener interface having predefined methods that helps to listen to all the events using 20+ methods that we need to implement. It listens to all the events with the help of EventFiringWebDriver class which fires the WebDriver events to be listened to.
With the help of these two, WebDriverEventListener and EventFiringWebDriver in Selenium, we can track events like afterAlertAccept, afterFindBy, beforeClickOn, onException, etc.
Predefined Methods for Java Event Listeners
To be able to work properly with Java Event Listeners, a good understanding of these predefined methods is appreciated. So, Before going forward to write the code and implement the WebDriverEventListener, let’s have a look at what these methods are and which event they interact with.
void beforeAlertAccept (WebDriver webDriver) – This method is called each time before Alert.accept().
void afterAlertAccept (WebDriver webDriver) – This method is called each time after Alert.accept().
void beforeAlertDismiss (WebDriver webDriver) – This method is called each time before Alert.dismiss().
void afterAlertDismiss (WebDriver webDriver) – This method is called each time after Alert.dismiss().
void beforeNavigateTo(String url, WebDriver webDriver) – This method is called before navigate().to(String url).
void afterNavigateTo(String url, WebDriver webDriver) – This method is called after navigate().to(String url) if no exception is thrown.
void beforeNavigateBack(WebDriver webDriver) – This method is called before navigate().back().
void afterNavigateBack(WebDriver webDriver) – This method is called after navigate().back() if no exception is thrown.
void beforeNavigateForward(WebDriver webDriver) – This method is called before navigate().forward().
void afterNavigateForward(WebDriver webDriver) – This method is called after navigate().forward() if no exception is thrown.
void beforeNavigateRefresh(WebDriver webDriver) – This method is called before navigate().refresh().
void afterNavigateRefresh(WebDriver webDriver) – This method is called after navigate().refresh() if no exception is thrown.
void beforeFindBy(By by, WebElement webElement, WebDriver webDriver) – This method is called before WebDriver.findElement(…), or WebDriver.findElements(…), or WebElement.findElement(…), or WebElement.findElements(…). In this method, if the find method of WebDriver is called then the element would be null.
void afterFindBy(By by, WebElement webElement, WebDriver webDriver) – This method is called after WebDriver.findElement(…), or WebDriver.findElements(…), or WebElement.findElement(…), or WebElement.findElements(…). In this method, if the find method of WebDriver is called then the element would be null.
void beforeClickOn(WebElement webElement, WebDriver webDriver) – This method is called before WebElement.click().
void afterClickOn(WebElement webElement, WebDriver webDriver) – This method is called after WebElement.click() if no exception is thrown.
void beforeChangeValueOf(WebElement webElement, WebDriver driver, CharSequence[] keysToSend) – This method is called before WebElement.clear() or WebElement.sendKeys(…).
void afterChangeValueOf(WebElement webElement, WebDriver webDriver, CharSequence[] keysToSend) – This method is called after WebElement.clear() or WebElement.sendKeys(…) if no exception is thrown.
void beforeSwitchToWindow(String windowName, WebDriver webDriver) – This method is called each time before WebDriver.TargetLocator.window(String).
void afterSwitchToWindow(String windowName, WebDriver webDriver) – This method is called each time after WebDriver.TargetLocator.window(String).
void onException(Throwable throwable, WebDriver webDriver) – This method is called whenever an exception is thrown during the execution.
void beforeGetText(WebElement webElement, WebDriver webDriver) – This method is called before WebElement.getText()
void afterGetText(WebElement webElement, WebDriver webDriver, String textFromWebElement) – This method is called after WebElement.getText()
Selenium WebDriver Java Event Listeners Example
For this Java Event Listeners tutorial, we will be using the following example test scenario flow to understand the code implementation and see the output.
Launch the browser and navigate to https://www.lambdatest.com/selenium-playground/simple-form-demo
Enter some data in the Enter Message textbox.
Click on the Get Checked value button.
Refresh the page.
This script would help us understand how different events are fired and captured and how we can use them for better logging and reporting.
To implement the Java Event Listeners, the following steps need to be performed in the IDE. For this Java Event Listener tutorial, I will use references to Eclipse IDE, but you can use the same code and follow steps in any other IDE of your choice as well.
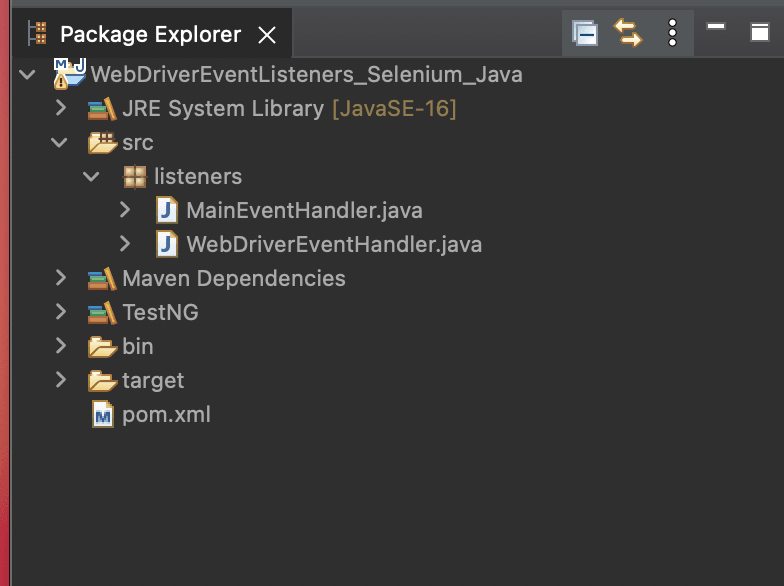
Create a Maven project in Eclipse and name it as WebDriverEventListeners_Selenium_Java
Update the pom.xml file to have Selenium (as we will be creating a Selenium automation testing script and use WebDriver Listeners from this) and TestNG (to execute the test and use annotations) dependencies.
 <project xmlns="http://maven.apache.org/POM/4.0.0" xmlns:xsi="http://www.w3.org/2001/XMLSchema-instance" xsi:schemaLocation="http://maven.apache.org/POM/4.0.0 https://maven.apache.org/xsd/maven-4.0.0.xsd">
   <modelVersion>4.0.0</modelVersion>
   <groupId>WebDriverEventListeners_Selenium_Java</groupId>
   <artifactId>WebDriverEventListeners_Selenium_Java</artifactId>
   <version>0.0.1-SNAPSHOT</version>
   <build>
     <sourceDirectory>src</sourceDirectory>
     <plugins>
       <plugin>
         <artifactId>maven-compiler-plugin</artifactId>
         <version>3.8.1</version>
         <configuration>
           <release>16</release>
         </configuration>
       </plugin>
     </plugins>
   </build>
   <dependencies>
       <dependency>
           <groupId>org.seleniumhq.selenium</groupId>
           <artifactId>selenium-java</artifactId>
           <version>3.141.59</version>
       </dependency>
       <dependency>
             <groupId>org.testng</groupId>
             <artifactId>testng</artifactId>
             <version>6.14.3</version>
             <scope>test</scope>
         </dependency>
   </dependencies>
 </project>
Create a package, and let’s name it as listeners.
Inside this package, we will have 2 Java files, WebDriverEventHandler and MainEventHandler.
WebDriverEventHandler class would implement the WebDriverEventListener interface methods.
MainEventHandler class would contain
The required Selenium automation testing script in Java language
The object of EventFiringWebDriver class
The object of WebDriverEventHandler class to register the EventFiringWebDriver class object and implement listener methods.
Code Walkthrough
Step 1 : Implement WebDriverEventListener in WebDriverEventHandler class.
package listeners;

import org.openqa.selenium.support.events.WebDriverEventListener;

public class WebDriverEventHandler implements WebDriverEventListener{
}
As soon as this is done, it would give an error to add all the unimplemented methods of the interface.
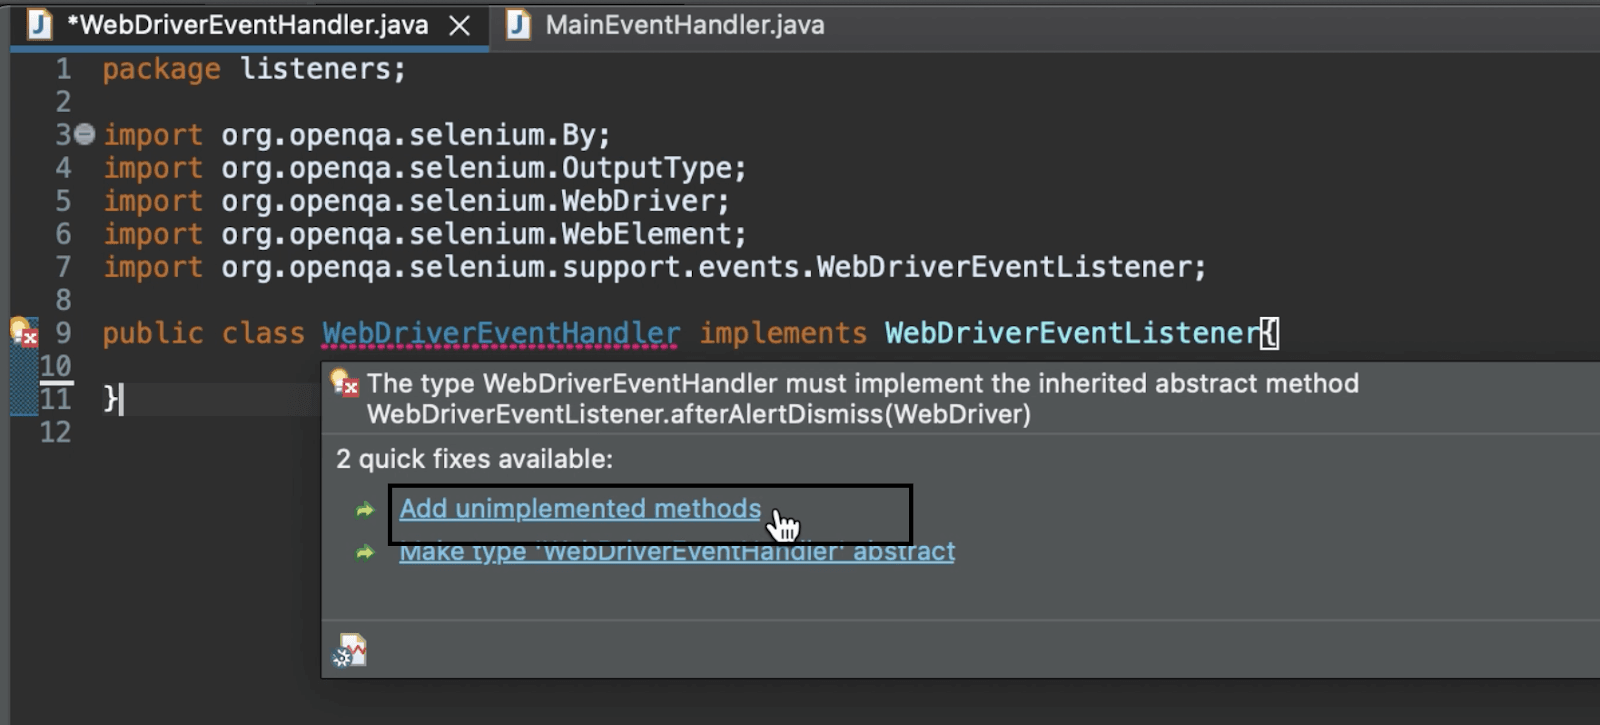
Hover over the error, and click Add unimplemented methods message to add them. These will come without a body, and the updated file would look like this.
package listeners;

import org.openqa.selenium.By;
import org.openqa.selenium.OutputType;
import org.openqa.selenium.WebDriver;
import org.openqa.selenium.WebElement;
import org.openqa.selenium.support.events.WebDriverEventListener;

public class WebDriverEventHandler implements WebDriverEventListener{

    @Override
    public void beforeAlertAccept(WebDriver driver) {
        // TODO Auto-generated method stub
    }

    @Override
    public void afterAlertAccept(WebDriver driver) {
        // TODO Auto-generated method stub
    }

    @Override
    public void afterAlertDismiss(WebDriver driver) {
        // TODO Auto-generated method stub
    }

    @Override
    public void beforeAlertDismiss(WebDriver driver) {
        // TODO Auto-generated method stub
    }

    @Override
    public void beforeNavigateTo(String url, WebDriver driver) {
        // TODO Auto-generated method stub
    }

    @Override
    public void afterNavigateTo(String url, WebDriver driver) {
        // TODO Auto-generated method stub
    }

    @Override
    public void beforeNavigateBack(WebDriver driver) {
        // TODO Auto-generated method stub
    }

    @Override
    public void afterNavigateBack(WebDriver driver) {
        // TODO Auto-generated method stub
    }

    @Override
    public void beforeNavigateForward(WebDriver driver) {
        // TODO Auto-generated method stub
    }

    @Override
    public void afterNavigateForward(WebDriver driver) {
        // TODO Auto-generated method stub
    }

    @Override
    public void beforeNavigateRefresh(WebDriver driver) {
        // TODO Auto-generated method stub
    }

    @Override
    public void afterNavigateRefresh(WebDriver driver) {
        // TODO Auto-generated method stub
    }

    @Override
    public void beforeFindBy(By by, WebElement element, WebDriver driver) {
        // TODO Auto-generated method stub
    }

    @Override
    public void afterFindBy(By by, WebElement element, WebDriver driver) {
        // TODO Auto-generated method stub
    }

    @Override
    public void beforeClickOn(WebElement element, WebDriver driver) {
        // TODO Auto-generated method stub
    }

    @Override
    public void afterClickOn(WebElement element, WebDriver driver) {
        // TODO Auto-generated method stub
    }

    @Override
    public void beforeChangeValueOf(WebElement element, WebDriver driver, CharSequence[] keysToSend) {
        // TODO Auto-generated method stub
    }

    @Override
    public void afterChangeValueOf(WebElement element, WebDriver driver, CharSequence[] keysToSend) {
        // TODO Auto-generated method stub
    }

    @Override
    public void beforeScript(String script, WebDriver driver) {
        // TODO Auto-generated method stub
    }

    @Override
    public void afterScript(String script, WebDriver driver) {
        // TODO Auto-generated method stub
    }

    @Override
    public void beforeSwitchToWindow(String windowName, WebDriver driver) {
        // TODO Auto-generated method stub
    }

    @Override
    public void afterSwitchToWindow(String windowName, WebDriver driver) {
        // TODO Auto-generated method stub
    }

    @Override
    public void onException(Throwable throwable, WebDriver driver) {
        // TODO Auto-generated method stub
    }

    @Override
    public <X> void beforeGetScreenshotAs(OutputType<X> target) {
        // TODO Auto-generated method stub
    }

    @Override
    public <X> void afterGetScreenshotAs(OutputType<X> target, X screenshot) {
        // TODO Auto-generated method stub
    }

    @Override
    public void beforeGetText(WebElement element, WebDriver driver) {
        // TODO Auto-generated method stub
    }

    @Override
    public void afterGetText(WebElement element, WebDriver driver, String text) {
        // TODO Auto-generated method stub
    }
}
After adding the unimplemented method, we can see that all of them are overridden and come with a ToDo stub. For example, in this Java Event Listeners tutorial, we will update the following methods to have a body like below to see the event logs listened for the example test scenario.
@Override
    public void beforeNavigateTo(String url, WebDriver driver) {
        System.out.println("Before navigating to : " + url);
    }

    @Override
    public void afterNavigateTo(String url, WebDriver driver) {
        System.out.println("After navigating to : " + url);
    }

    @Override
    public void beforeNavigateRefresh(WebDriver driver) {
        System.out.println("Before refreshing the page");
    }

    @Override
    public void beforeFindBy(WebDriver driver) {
        System.out.println("Before finding the web element");
    }

    @Override
    public void beforeClickOn(WebElement element, WebDriver driver) {
        System.out.println("Before clicking");
    }

    @Override
    public void afterClickOn(WebElement element, WebDriver driver) {
        System.out.println("After clicking");
    }

    @Override
    public void afterChangeValueOf(WebElement element, WebDriver driver, CharSequence[] keysToSend) {
        System.out.println("After entering the value");
    }
Step 2: Next, we move to the MainEventHandler class file, where we would create an instance of WebDriver (as driver) to execute our automation script. In this code example, we will be executing the code on a Selenium Cloud Grid using an instance of Selenium RemoteWebDriver.
The reason being, along with the advantages of Selenium Grid like executing multiple cases together across a variety of browsers and OS, a Cloud Grid also offers the speed and scalability which makes executions faster and more reliable with improved debugging and troubleshooting support.
An example of one such Selenium Cloud Grid is LambdaTest, which facilitates cross browser testing across 3000+ real browsers and OS. Selenium testing tools like LambdaTest provide interactive reporting dashboards for results analysis along with all the benefits of using a cloud grid. In this Java Event Listeners tutorial, LambdaTest remote grid will be used for our execution.

public RemoteWebDriver driver = null;
Step 3: Next would be to add LambdaTest username and access key for your account to be used to run the script. You can create your account here.
String username = "<LambdaTest_Username>";
String accessKey = "<LambdaTest_Accesskey>";
Step 4: After that, add the first method in this file as setUp(), which would be used to set initial capabilities for the browser and launch the grid with given credentials. Since this needs to be done for each test case before executing it, @BeforeTest TestNG annotation is being used.
@BeforeTest
public void setUp() throws Exception {
 DesiredCapabilities capabilities = new DesiredCapabilities();
 capabilities.setCapability("browserName", "Chrome");
 capabilities.setCapability("version", "92.0");
 capabilities.setCapability("platform", "Windows 10");
 capabilities.setCapability("resolution", "1024x768");
 capabilities.setCapability("build", "Selenium Automation Testing");
 capabilities.setCapability("name", "Events And Listeners with JAVA");
 capabilities.setCapability("network", true); // To enable network logs
 capabilities.setCapability("visual", true); // To enable step by step screenshot
 capabilities.setCapability("video", true); // To enable video recording
 capabilities.setCapability("console", true); // To capture console logs
 try {
 driver = new RemoteWebDriver(
 new URL("https://" + username + ":" + accessKey + "@hub.lambdatest.com/wd/hub"), capabilities);
 } catch (MalformedURLException e) {
 System.out.println("Invalid grid URL");
 }
}
Step 5: Just like the setUp() method would create the driver instance to be used for executing the script, it is a good practice to close/kill this instance as soon as the case is completed. To facilitate the same, add the next method as teardown() to quit the driver instance. This would have @AfterTest annotation as it needs to be executed after each case as well.
@AfterTest
public void teardown() {
    driver.quit();
}
Step 6: Having done the setup for driver creation, the next method would be the main test case method that will drive the case using @Test annotation.
@Test(enabled = true)
    public void testEventListerners() {
}
Here (enabled = true) means that this case can be executed each time a script is triggered inside this method.
Step 7: Create an object of EventFiringWebDriver and pass the WebDriver object as a parameter to this:
EventFiringWebDriver eventFiringWebDriver = new EventFiringWebDriver(driver);
Step 8: Create an object of WebDriverEventHandler class. This will be used to register the EventFiringWebDriver, i.e., to listen to the events.
WebDriverEventHandler webDriverEventHandler = new WebDriverEventHandler();
eventFiringWebDriver.register(webDriverEventHandler);
Step 9: Use this object of EventFiringWebDriver to navigate, find elements and make all actions.
eventFiringWebDriver.navigate().to(<URL_of_the_website_to_test>");
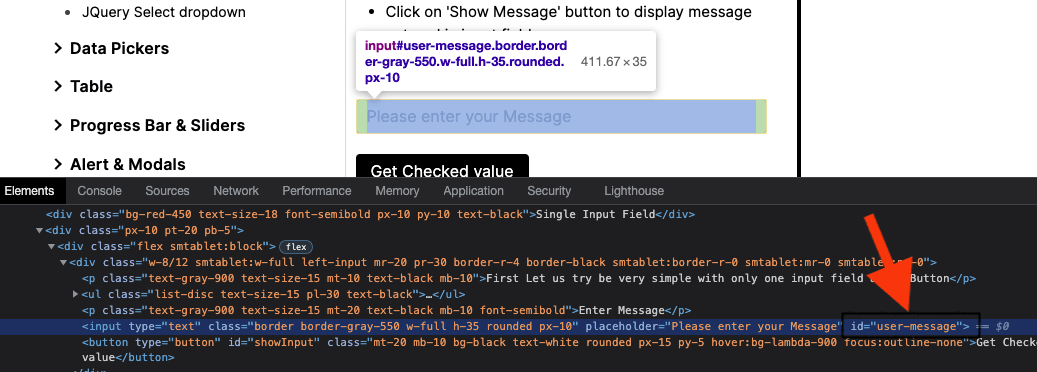
eventFiringWebDriver.findElement(By.id("user-message")).sendKeys("<Any_data>");
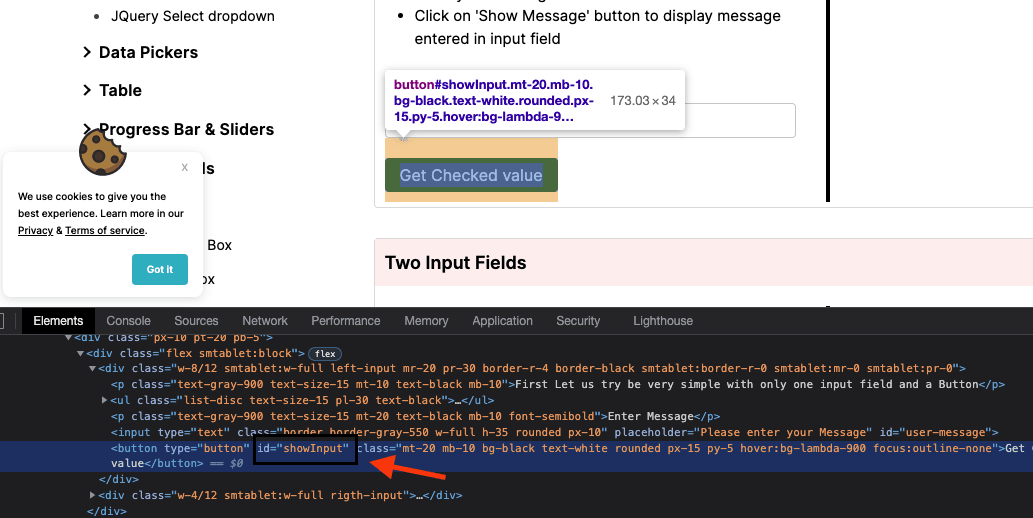
eventFiringWebDriver.findElement(By.id("showInput")).click();
eventFiringWebDriver.navigate().refresh();
In this sample, navigate().to() is used to navigate to the website and navigate().refresh() to refresh the web page. In this example, both the web elements are fetched using their unique id. For this, right-click on the webpage and click on Inspect. You can then fetch the id as following:
We use web element methods of click() to click on the button and sendKeys() to enter data in the text box.
Step 10: Lastly, unregister the object.
eventFiringWebDriver.unregister(webDriverEventHandler);
This is how the completed code file for Step 2 would look, including remote execution setup, event, and listener in Java and Selenium automation testing script.
package listeners;

import java.net.MalformedURLException;
import java.net.URL;

import org.openqa.selenium.By;
import org.openqa.selenium.remote.DesiredCapabilities;
import org.openqa.selenium.remote.RemoteWebDriver;
import org.openqa.selenium.support.events.EventFiringWebDriver;
import org.testng.annotations.AfterTest;
import org.testng.annotations.BeforeTest;
import org.testng.annotations.Test;

public class MainEventHandler {

    public RemoteWebDriver driver = null;
    String username = "<LambdaTest_Username>";
    String accessKey = "<LambdaTest_Accesskey>";;

    @BeforeTest
    public void setUp() throws Exception {
        DesiredCapabilities capabilities = new DesiredCapabilities();
        capabilities.setCapability("browserName", "Chrome");
        capabilities.setCapability("version", "92.0");
        capabilities.setCapability("platform", "Windows 10");
        capabilities.setCapability("resolution", "1024x768");
        capabilities.setCapability("build", "Selenium Automation Testing");
        capabilities.setCapability("name", "Events And Listeners with JAVA");
        capabilities.setCapability("network", true); // To enable network logs
        capabilities.setCapability("visual", true); // To enable step by step screenshot
        capabilities.setCapability("video", true); // To enable video recording
        capabilities.setCapability("console", true); // To capture console logs

        try {
            driver = new RemoteWebDriver(
                    new URL("https://" + username + ":" + accessKey + "@hub.lambdatest.com/wd/hub"), capabilities);
        } catch (MalformedURLException e) {
            System.out.println("Invalid grid URL");
        }
    }


       @AfterTest
    public void teardown() {
        driver.quit();
    }

    @Test(enabled = true)
    public void testEventListerners() {

        EventFiringWebDriver eventFiringWebDriver = new EventFiringWebDriver(driver);
        WebDriverEventHandler webDriverEventHandler = new WebDriverEventHandler();
        eventFiringWebDriver.register(webDriverEventHandler);

        eventFiringWebDriver.navigate().to("https://www.lambdatest.com/selenium-playground/simple-form-demo");
        eventFiringWebDriver.findElement(By.id("user-message")).sendKeys("WebDriver Event Listener");
        eventFiringWebDriver.findElement(By.id("showInput")).click();
        eventFiringWebDriver.navigate().refresh();

        eventFiringWebDriver.unregister(webDriverEventHandler);
    }
}
Code Execution and Output Review
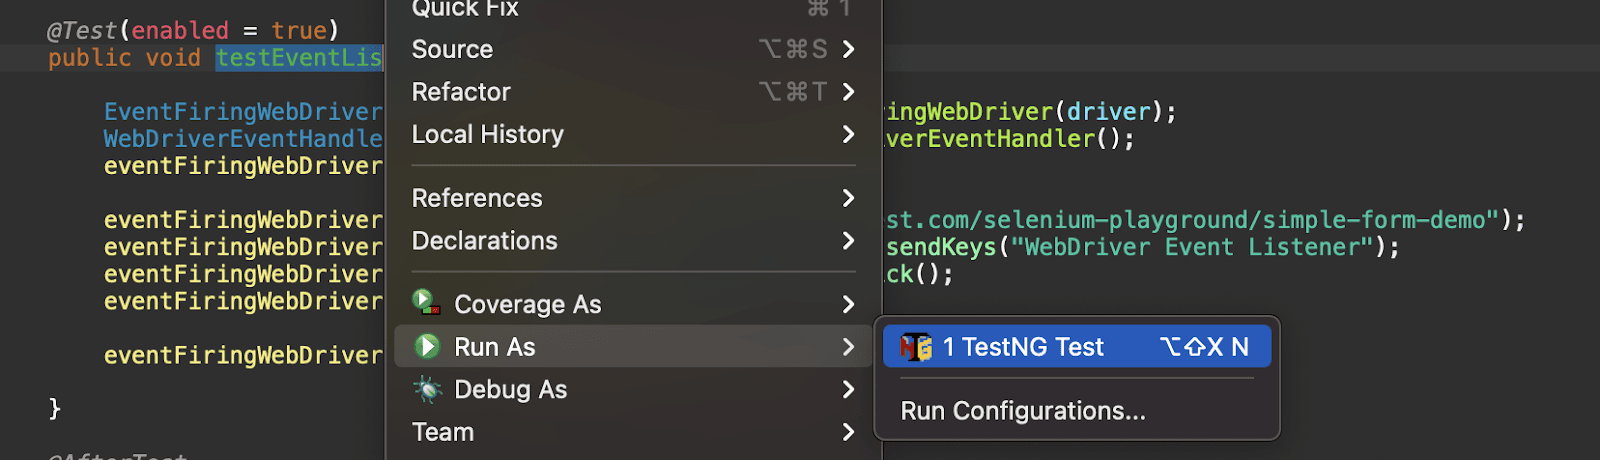
Once we have written the code, go ahead and execute it to see the output. To execute, hover the mouse over the test case method name (testEventListeners), right-click and select Run As and click on TestNG Test.
Logs on the local system can be tracked under Console, and we can see all the logged events as per the listener methods implemented earlier for given actions.
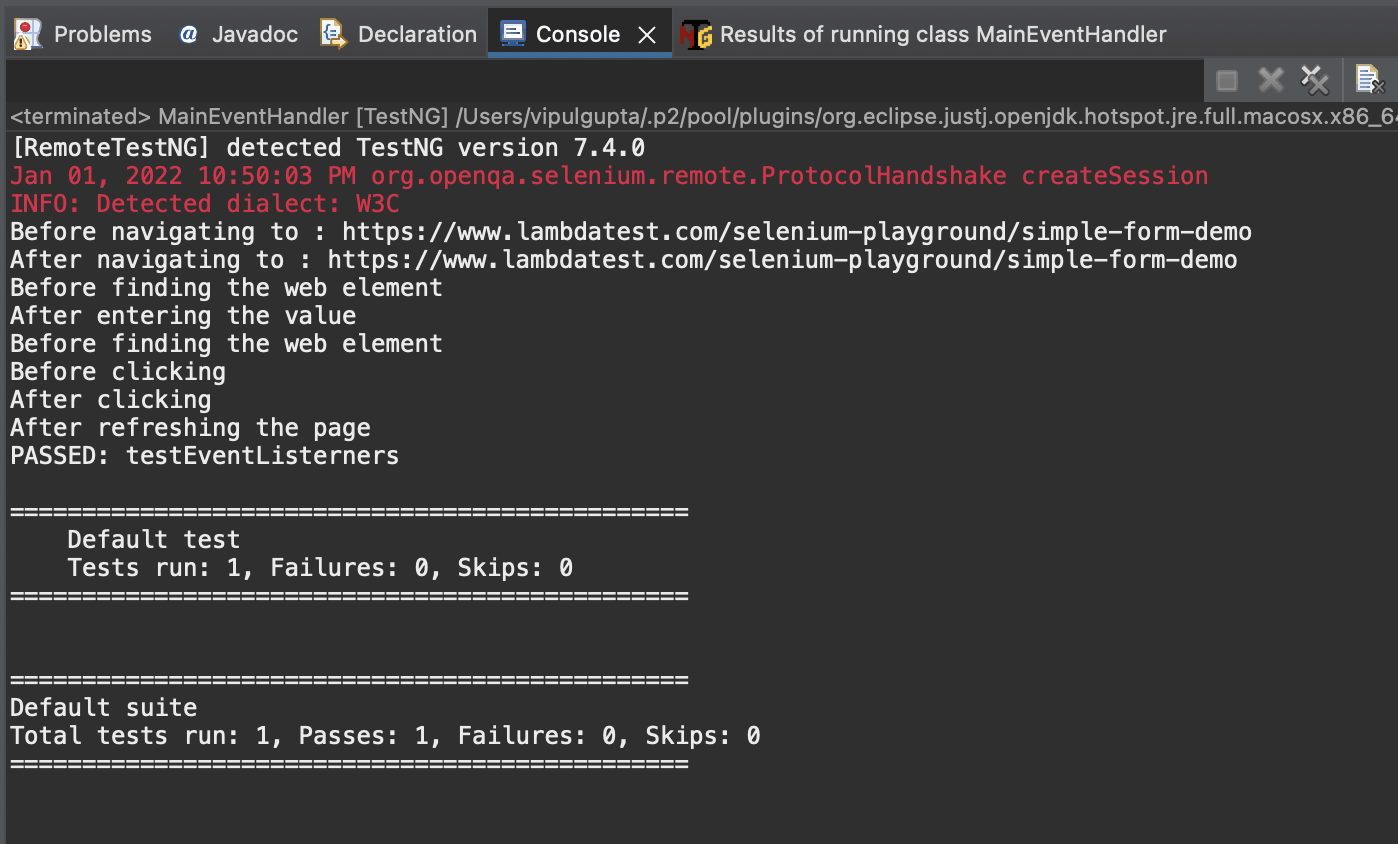
We can see all the events logged on the report as we have marked them in WebDriverEventHandler class for each action done in the test script. These events and actions can be associated as:
Navigating to the website
eventFiringWebDriver.navigate().to("https://www.lambdatest.com/selenium-playground/simple-form-demo");This line of code interacts with beforeNavigateBack() and afterNavigateBack() methods, and hence the events log.
  Before navigating to : https://www.lambdatest.com/selenium-playground/simple-form-demo
  After navigating to: https://www.lambdatest.com/selenium-playground/simple-form-demo
Finding the web element and entering the data
eventFiringWebDriver.findElement(By.id("user-message")).sendKeys("WebDriver Event Listener");This line of code interacts with beforeFindBy(), afterFindBy(), beforeChangeValueOf() and afterChangeValueOf(). But since we added a sysout statement for events only on beforeFindBy() and beforeChangeValueOf(), hence the following events were listened only.
  Before finding the web element
  After entering the value
Finding the web element and clicking on Get Checked value button
eventFiringWebDriver.findElement(By.id("showInput")).click();Just like the enter data step above, this action also has multiple events fired beforeFindBy(), afterFindBy(), beforeClickOn() and afterClickOn(). So, in this code example except for afterFindBy() all methods are implemented and hence the following event logs.
  Before finding the web element
  Before clicking
  After clicking
Refreshing the page
eventFiringWebDriver.navigate().refresh();This step interacts with before and after methods of the navigate refresh function, thus generating given event logs since we implemented the after refresh method.
After refreshing the page
Results on LamdaTest Dashboard
Once the execution is completed, log in to your LambdaTest Dashboard, and the execution can be found under recent tests.
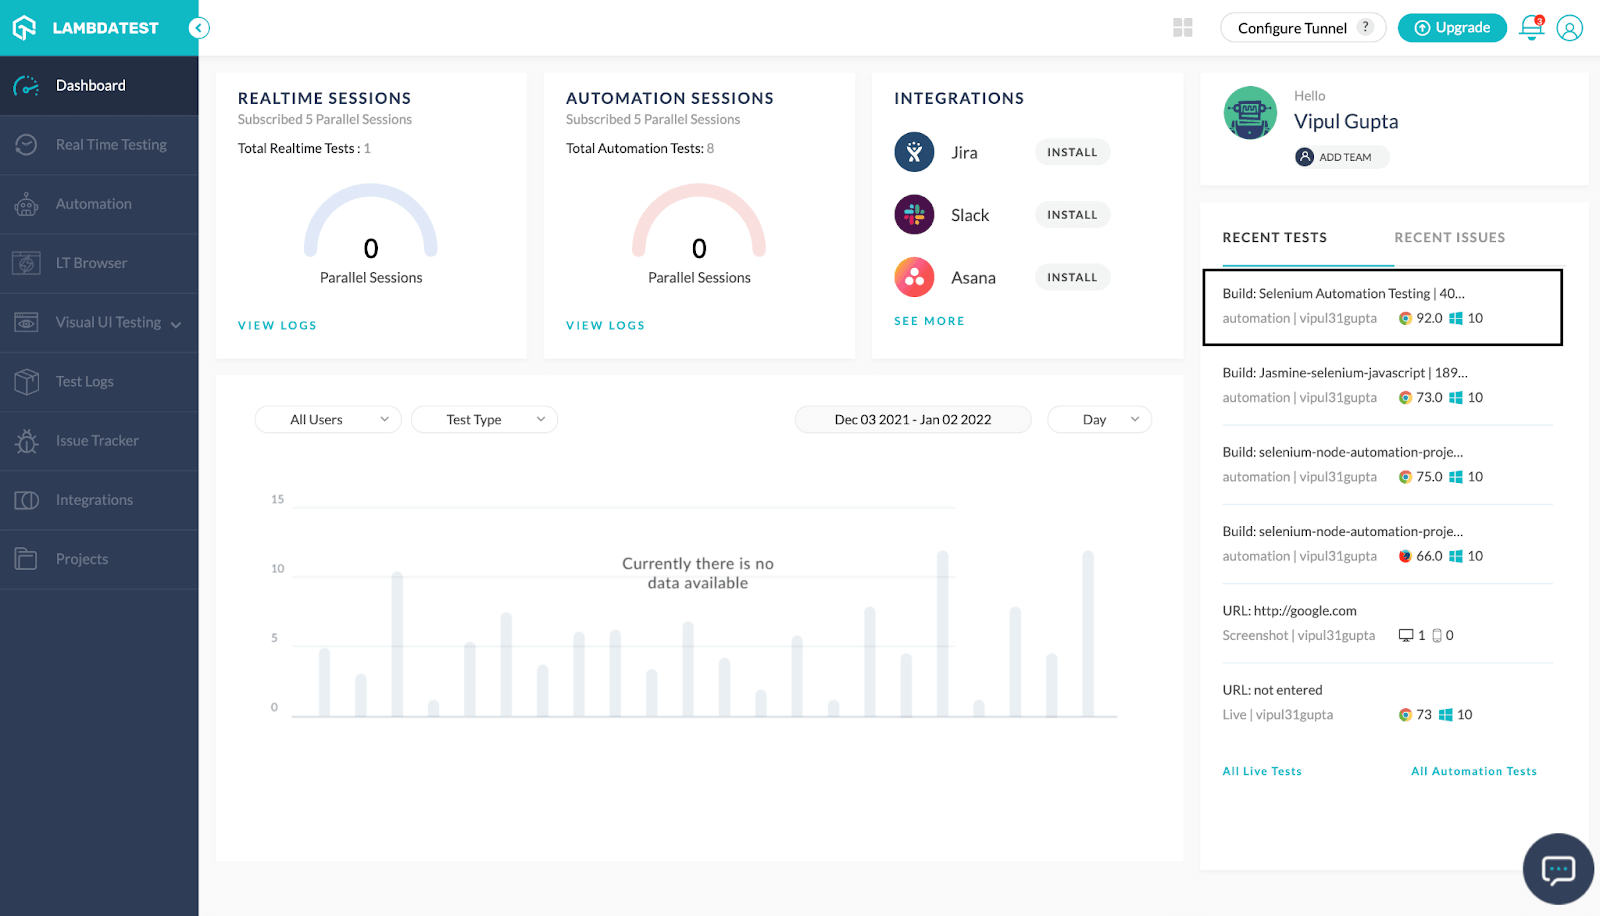
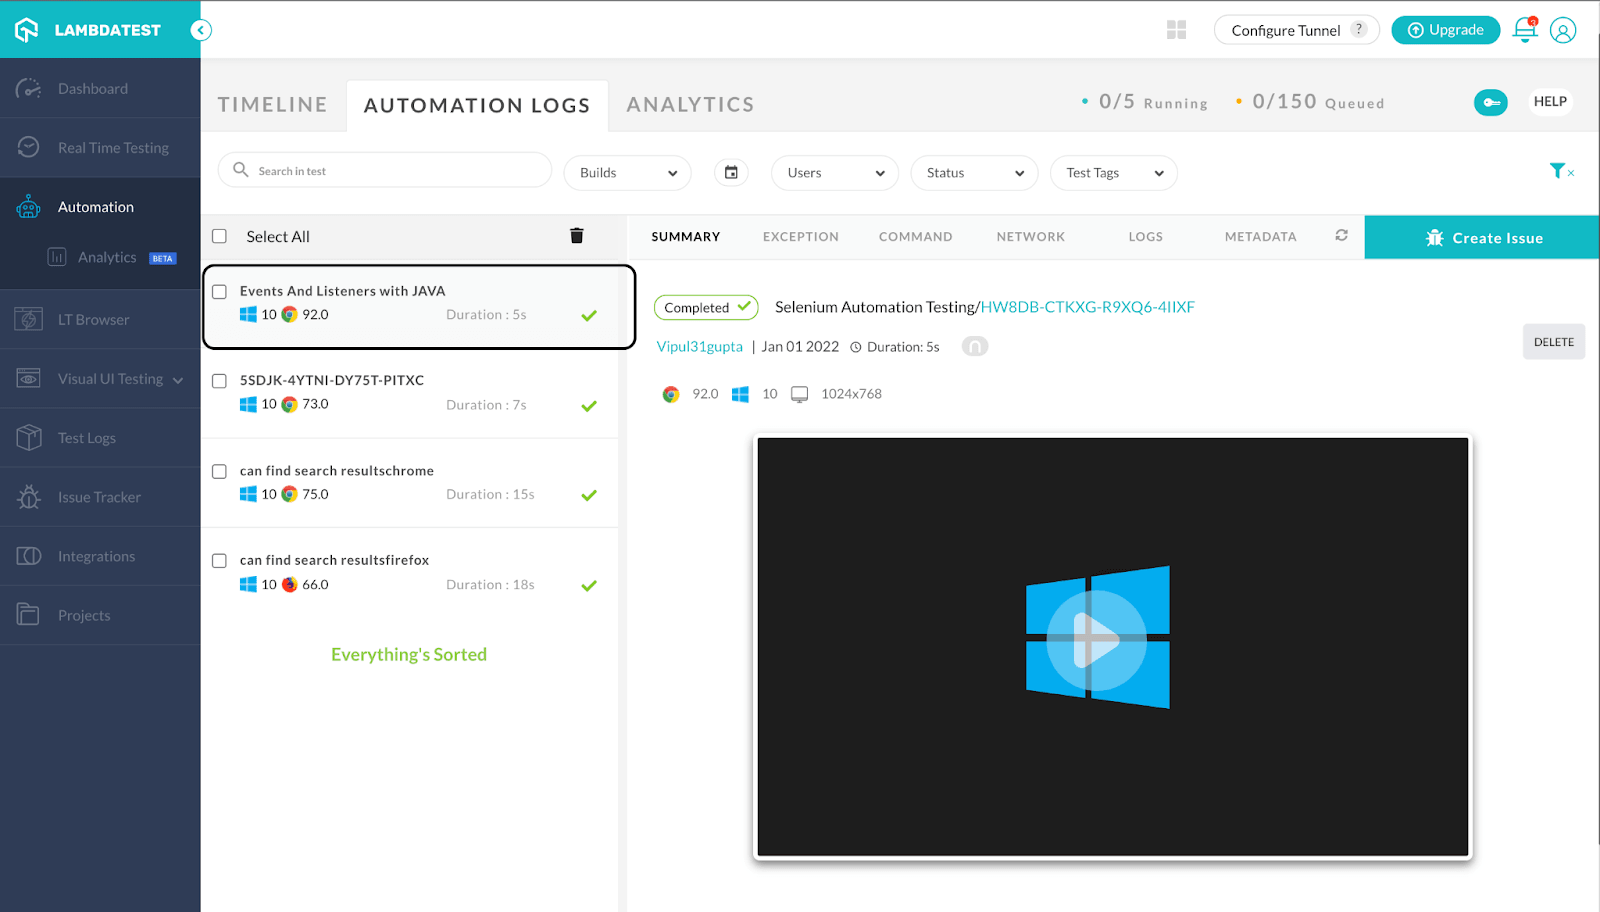
Click on this to get redirected to the Automation Logs section to analyze the detailed logs, execution video, and screenshots as required.
You can now also better track the associated data with your test build by going to the LambdaTest Analytics section under the Automation tab.
This gives you a good overview of your test case health and the trends like the number of cases executed, pass rate, fail rate along with a number of filters like date range, users, browser and OS versions, etc., which enables the user to have good filtering on the data and analyze it as required.
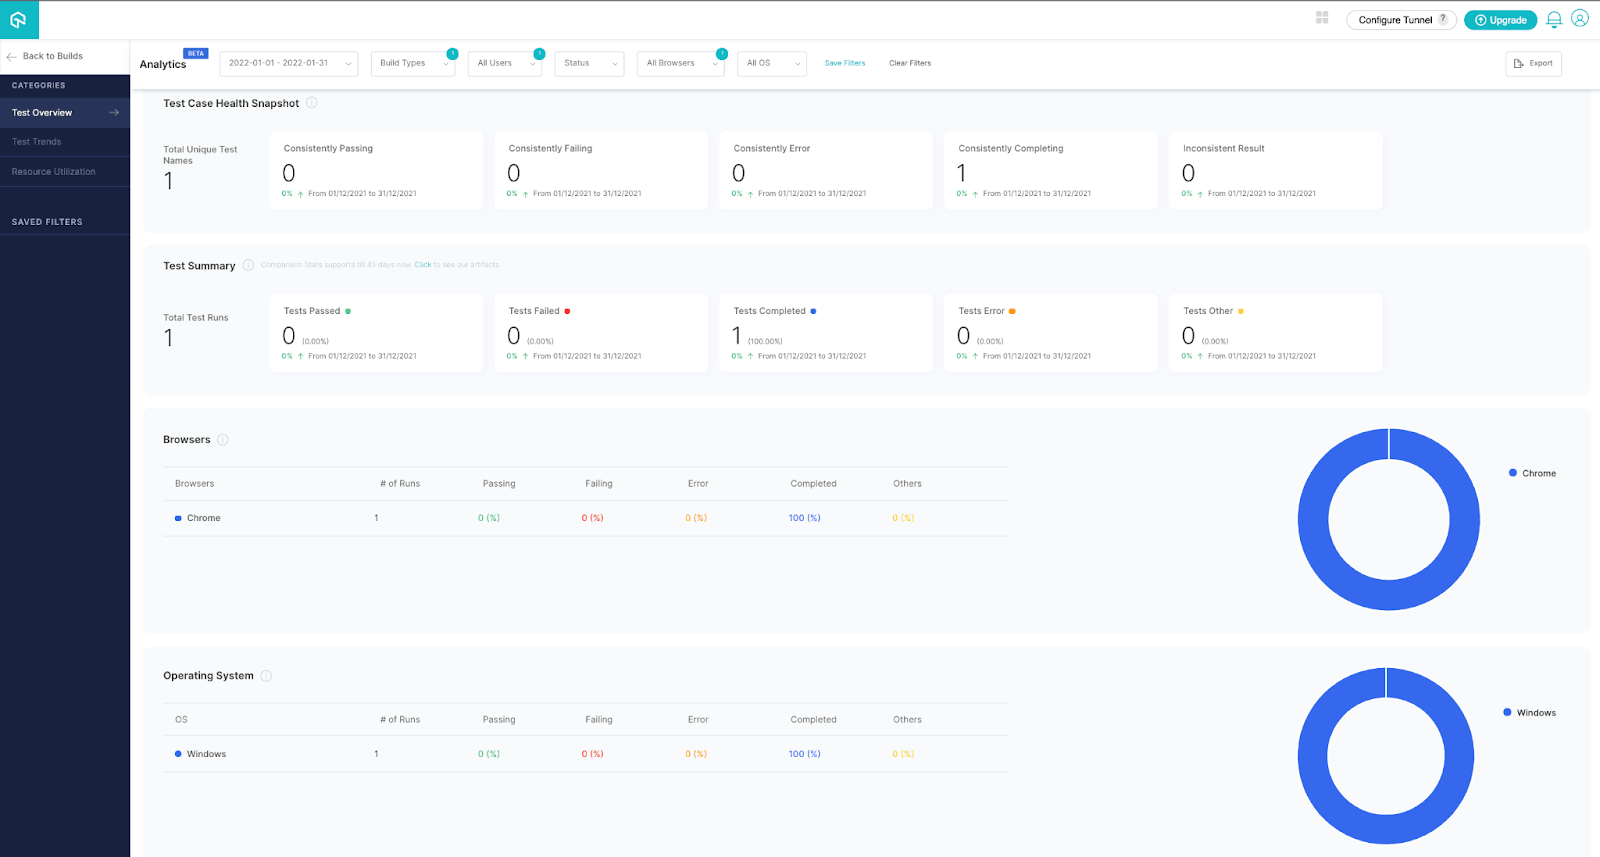
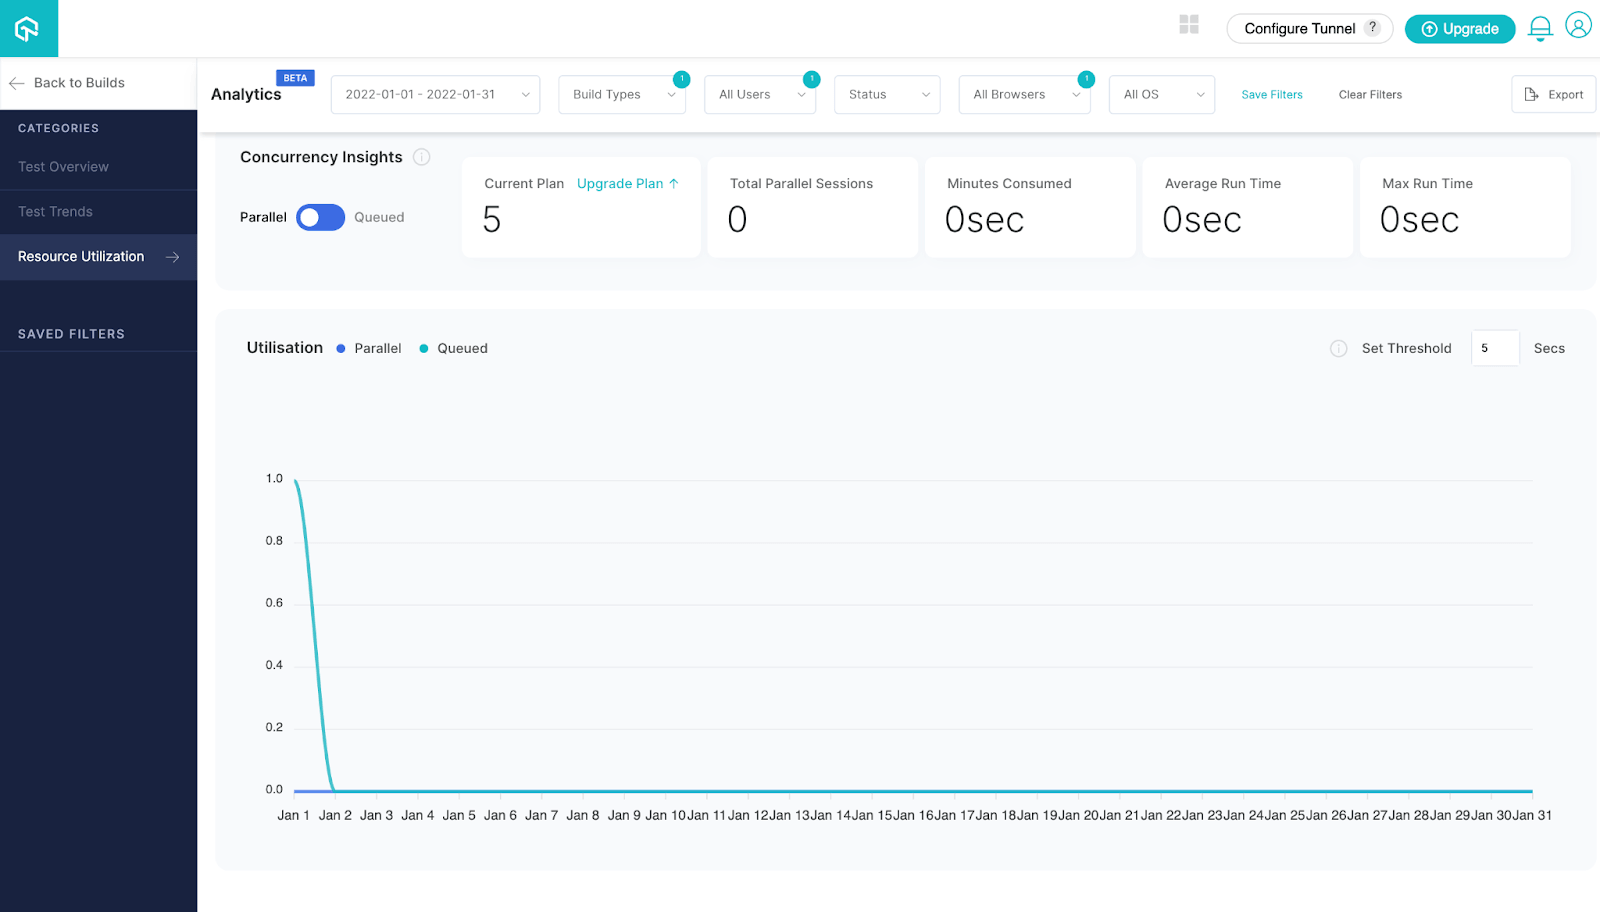
Do check out this and keep an eye on this section for more updates and how this can help with your builds and provide insightful information to improve execution.
Wrap Up!!
So with this Selenium Java tutorial on Java Event Listeners, we have learned what WebDriver listeners are in Selenium and how we can implement them in Selenium automation testing to make the life of a tester better with more logs and reporting. It’s time for you to jump into this pool of events and listeners and explore what all can unfold with their power.
Happy Listening!!